Do you want to sharpen your scissors yourself? Good idea or not, make up your own mind.
In this article I'll show you what you really need to sharpen your scissors.
I'll tell you:
1. How to sharpen your scissors extremely sharply on a sharpening stone
2. What to do if you've never sharpened scissors and your blades have become as dull as an old, rusty wooden nail
3. How long you should sharpen scissors so that they become really sharp
I will also answer a few other questions on this topic.
Like for example:
- At what angle should you sharpen your blades and how do you keep this angle stable?
- What grit should your sharpening stones have?
- What can you do to ensure that your scissors stay sharp longer even after sharpening?
But before we get to the grindstone...
Let's look at the most common scissor sharpening mistakes that will destroy your blade - and that you should definitely avoid:
Let's make it short.
Here are the 7 most common sanding mistakes:
- You start by sanding too quickly and don't give yourself enough time to learn the sanding process. This way you rob yourself of the chance to get a feel for the right angle.
- You make different and confusing grinding movements. As a result, the sharpening angle does not remain constant and the cutting edge of the blade becomes uneven.
- You change the grinding side of the scissors too quickly - before a burr has formed (more on the burr below).
- You change the side of the blade before the burr has formed over the entire edge - this only makes the blade sharp in places.
- The angle is either too shallow - or too wide. This changes the geometry and the cutting edge of the scissors.
- You chose the wrong grit for the sharpening stone for your scissors. With the right grit you save a lot of time and get a better result.
- You've only sharpened the middle part of the blade - the edge on the handle and the tip are still dull.
All of these mistakes mean that your blade will either remain dull after sharpening - or be completely ruined. And especially when beginners want to sharpen their scissors, they make all these mistakes in one go, just like I did at the beginning.
But I have to confess one thing to you:
I copied the best answer to the question so far from Schmiedeglut:
"Maximum 20° - anything above that is no longer a blade and no longer cuts well." Done, there's nothing more to say.
But what does that mean?
If the sharpening angle is 25°, then you will have a cutting angle of 50° and that is practically a dull blade.
Therefore, your grinding angle should be between 10° and 20°. The smaller the angle, the sharper and more precise you can work with your blade.
If you have scissors made of SUS440C or Damascus steel, the blades are particularly hard and stable. You can sharpen these blades at a very fine and small angle - for example 10°.
On the other hand, you should not grind stainless steel scissors at an angle that is too small because the steel is too “soft” for this low grinding angle.
In other words: If the cutting edge is so thin, it can break off very quickly.
How do you determine the correct grinding angle?
Hold the blade of your scissors vertically at a 90° angle on the sharpening stone.
Halve the angle to 45° so that the blade points diagonally to the whetstone.
Halve this angle again - then your blade will be at approximately 22°.
If you then tilt your blade a little further towards the grindstone, you are below 20° and can bring your scissors to a proper sharpness.
And another thing:
Whether the angle is 15° or 17° ultimately makes little difference in practice. In both cases the blade is sharp and it's fun to cut with it again. So you don't have to measure the exact angle with a set square.
How do you keep the angle stable and constant when grinding?
Once you have found an angle for grinding, you have to stick to it consistently, otherwise you will ruin the cutting edge.
I can tell you from my own practice: It's really not easy at the beginning. During my first attempts, I scratched half of my scissors without realizing it. And so that the same thing doesn't happen to you and you do everything right from the start, I have some tips for you here.
The first commandment is: grind slowly.
Your hands and eyes first have to get used to this “new” movement pattern. Therefore, you need to introduce the grinding motion slowly. If you're too hasty, you may unconsciously get used to a wrong move and have to "retrain" yourself afterwards.
It's like in driving school - before you hit the motorway in kickdown, you slowly practice in the 30 zone.
Let's move on:
- Hold the scissors firmly. I recommend that you grip your scissors so that you wrap your middle, ring and little fingers around the handle - fixate the joint with your thumb and "pinch" the blade with your index finger. This means the scissors remain stable in your hand and you have more control over the sharpening angle.
- Do not put pressure on the blade. It is enough if you simply push the blade back and forth without pressing the blade against the stone. The less pressure you put on the blade, the more control you have over the sharpening angle.
- You can also use an angle helper. There are many different grinding aids. Some allow you to set different angles, while others limit you to one or two fixed angles. But in any case, they help you maintain the exact grinding angle.
As soon as you can keep the angle stable, you are almost a professional at sharpening. If you have good hearing, I have another tip for you from our grinding masters in China:
If you hold your knife at the same angle while sharpening, the sharpening stone will always make the same noise. If you change the angle by one degree, the noise when grinding also changes.
Wrong: tscht - tscht - tscht - tscht - tscht - tscht - tscht (different angles)
Correct: tscht - tscht - tscht - tscht - tscht (constant angle)
Whoever has ears to hear, let him hear.
Sharpening scissors with a sharpening stone: This is how it's done easily
Sharpening and sharpening scissors is a science. But anyone can learn it - and anyone can do it well.
First place your whetstone in the water so that it can soak up. Some stones are full after a few minutes - others take over 10 minutes. I'll tell you below how long your stone should be in the water - so stay tuned.
Then place your scissors on the sharpening stone at the appropriate angle and start sharpening: simply push your scissors away from you against the cutting edge - and then pull them back towards you.
You can either do the movement in one go - i.e. push the blade away from you from the tip to the handle and then pull it back from the handle to the tip.
Or you can work your way step by step from back to front. First, grind the cutting edge area on the handle. Then the midfield of the cutting edge. And finally the cutting edge in the tip area. You simply push the scissors back and forth at the right angle without applying any pressure.
However, you have to be careful with the tip of the blade that the sharpening angle does not change. Since some grooming scissors have a curved blade, the cutting edge rounds slightly at the tip. And if you don't counteract this, the grinding angle will change. Therefore, you have to lift the scissors slightly so that the entire cutting edge touches the sharpening stone in the tip area.
That's it - sharpening knives is that easy.
If you've previously thought that there has to be one technique for the perfect cut, then you can breathe easy - it doesn't exist.
When sharpening there is only one thing that matters: removing material from the blade.
How you go about it is irrelevant. That means:
- You can sharpen your scissors from handle to tip in one go
- You can work your way gradually from the handle to the tip
- You can grind against the cutting edge or with the cutting edge
- You can make lots of small circular movements
Anything is allowed when grinding - as long as you remove material and maintain a constant angle. And this “freedom in grinding” leads us to the question: “How long do I have to grind?” Only your scissors can tell you that.
During sharpening, a burr forms at some point on the side of the blade that faces upwards. Or to put it another way: a small and fine edge (the burr) forms on the side that was not sharpened. You should be able to feel this ridge on the entire cutting edge - from the handle to the tip. You can see this ridge when you run your fingertip from the back of the blade to the cutting edge.
You will notice your finger catching on the cutting edge - or having a slight resistance (it feels rough, snappy or just sharp).
As soon as this burr has formed, you can change the side and grind the unground side - where the burr has formed.
Do this until you have sanded away this burr and a very fine burr has now formed on the previous side of the blade (the side that now faces upwards).
It is not easy to completely remove the burr. There will almost always be a small amount left over if you only use a whetstone for honing. That's not a problem because your scissors still have good sharpness - but the difference in cutting is enormous when there is no burr left.
Here are some tips on how to completely remove the burr:
If you have a polishing stone with a grit of over 3000, you can sharpen the blade on this polishing stone. You can use a sanding pad to remove it and achieve an even better result than with the polishing stone. If you don't have a polishing stone or a sanding leather on hand, you can use your jeans if necessary. Simply pull one pant leg taut and pull your blade toward the cutting edge (not against the cutting edge). You can do this in a kind of "brush movement" - as if you were wiping away dust with your scissors.
Do this brush movement 3 - 4 times, after which you should no longer be able to feel any burrs.
To top it off, do a short sanding cycle of 5-6 sanding movements per cutting edge. In doing so, you practically shift the ridge from one side to the other side. After you have processed both sides and a burr has formed along the entire cutting edge on both sides, you are finished with the grinding.
All that's missing is the last step:
You have to remove this burr. You do this by pulling the knife off the sharpening stone. First one side, then the other and the whole thing alternately until you can no longer feel a ridge.
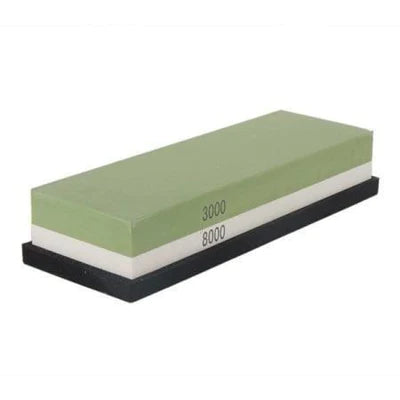
The whetstone: What grit do you need?
A whetstone is like sandpaper, only harder and more stable.
The coarser the surface of the grindstone - the more and faster you remove material. But just as coarse-grained sandpaper leaves a very rough surface, the cutting edge of the scissors becomes just as rough after sanding.
That's why you always need two sharpening stones:
A rough, low-grit whetstone to remove a lot of material quickly. A fine sharpening stone with a high grit to remove the traces of pre-sharpening and give your blade the finishing touch.
What does it all look like in numbers?
For pre-sanding/repair sanding, you can use a grinding stone with a grain size of around 1000j. You do the main sanding with a grain size of around 3000j. For fine grinding/polishing you can use grinding stones (polishing stones) with a grain size of 8000j or more. The higher the grit, the finer and sharper the cutting edge can be. If your scissors are not completely destroyed or as dull as a wooden board, then a sharpening stone with a medium grit of 2000j is sufficient for one Main cut completely.
On the one hand, you can easily improve the cutting edge and, on the other hand, restore good sharpness to your scissors. And if you want to polish your scissors to scalpel sharpness, then it's best to do this with several polishing stones and increase the grit until you can see the reflection in your blade.
I don't recommend a combination stone with two different grain sizes. Such stones usually have a low and medium grain size.
However, since each side wears differently, a flat surface is not possible for long and the angle no longer remains constant.
What you should also consider to choose the right grit size for your whetstone:
Some sharpening stones are specified with a grit of 320 J and others with a grit of 600 F. But if you compare stones with each other, you will notice that the surface is identical.
Why is that?
The reason for this are the different standards:
On the one hand, you have the Japanese standard JIS (Japanese Industrial Standard) and the European standard FEPA. Japanese sharpening stones are usually marked with JIS and European sharpening stones, such as the Belgian Brocken, are marked with the FEPA standard.
Then there is a third standard, which occurs almost exclusively in the area of diamond abrasives - ANSI (American National Standards Institute).
What you need to do if you have NEVER sharpened your scissors
If you have been using your scissors for a long time and have never sharpened them, the blade is probably very dull - or even broken and covered in numerous small chips. Only one thing helps:
You have to reposition the cutting edge.
Or simply put, you need to repair your scissors.
To do this, you need at least two grinding stones with a coarse grit of around 600j and one medium-grit grinding stone of 1200j.
If you want to sharpen scissors, you should expect a good hour of work - the more experience you have, the less time you will need.
First you start with the pre-sanding:
Take the coarse wet whetstone and remove material from the blade until a burr has formed across the entire cutting edge. I recommend a grit of 600j for extremely dull/broken blades because you really have to remove a lot of material. As soon as you can feel the burr on the entire blade, turn your scissors over and repeat the process until a burr has formed again.
And now pay attention:
You don't change the grindstone. Instead, turn your scissors back to the other side and sharpen the blade again until you feel a burr. Then turn the blade again and grind again to the burr.
You repeat the whole thing about 3-4 times. You should have ground away enough material from the scissors to reveal a new, virgin cutting edge. Only then can you change the sharpening stone and use the medium grit to remove the marks from the pre-sanding.
In other words: “smooth” the cutting edges and reduce the burr until you can hardly feel it anymore - done.
Finally, if you have a leather peeler, you can use your scissors to remove the burr completely.
"How do I keep my scissors permanently sharp after sharpening?"
In order for scissors to stay sharp, you have to keep them sharp.
Sounds easy, but is it possible with the right tools?
And what do you need for it? I recommend a high-quality whetstone. Some of these are around 40 euros. This means you can sharpen your scissors and need to sharpen them much less often.
What happens when sharpening?
Unlike grinding, you don't remove any material - you bend the cutting edge.
This means that when you work with scissors, the cutting edge bends in a microscopic area, creating a burr and causing the blade to lose some of its sharpness.
But you don't have to grind away this tiny burr. With a With a whetstone, you can instead bend it back into place and sharpen your blade again in the simplest way.
You don't even need any special technology:
Simply place the blade on the Apply the whetstone and pull the blade off against the cutting edge in one go. First one side, then the other side - each alternating.
Repeat this a few times until you can no longer feel any burrs on the cutting edge. That was it.
By the way:
If you have scissors with Japanese blades with over 60 HRC, you should not use sharpening steel. On the one hand, the blades are often harder than the sharpening steel and on the other hand, the edges are extremely susceptible to breakage.
To keep scissors with a high Rockwell hardness sharp, you should only use a sharpening leather.
Leave a comment
This site is protected by hCaptcha and the hCaptcha Privacy Policy and Terms of Service apply.